Managing gateways
A gateway is the named installation of a tenant. The gateway sets the providers and models that are available, the rules for the content, the budget, and the API tokens permitted.
Creating a gateway
The following requirements are met:
- ☑ Your user account has the Manage gateways and routing permission.
Proceed as follows to create a gateway:
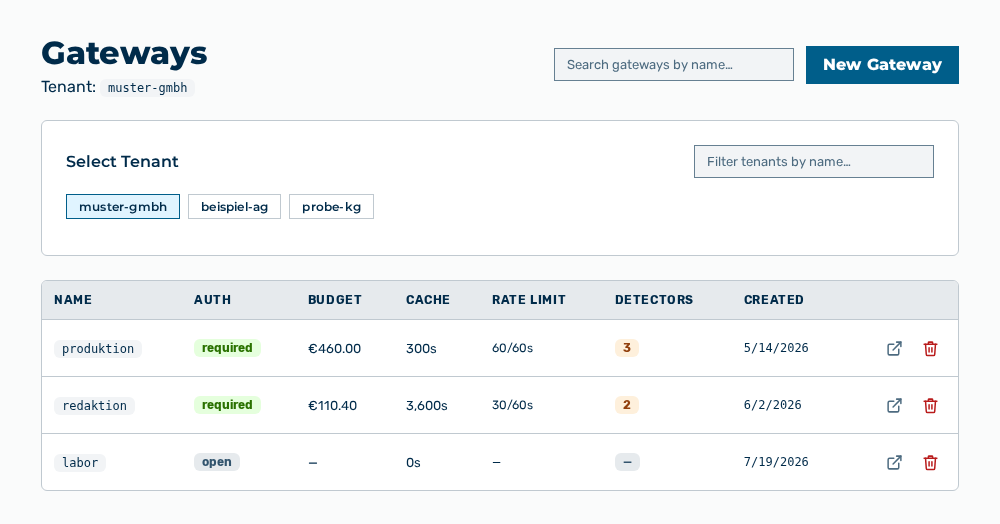
Gateways view
-
► In the Settings area, open the Gateways entry.
- ▷ On the start page, click on your name at the bottom of the navigation bar.
- ↳ The user menu opens.
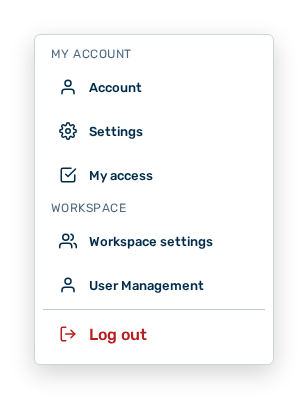
User menu
- ▷ In the My Account group, click on the Settings entry.
- ↳ The navigation bar shows the Settings area. The Gateways entry is open.
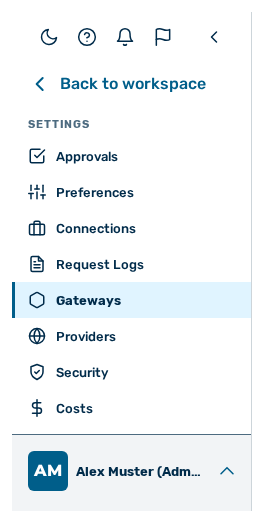
Navigation bar in the Settings area
-
► Click on the New Gateway button.
- ↳ The New Gateway dialog opens.
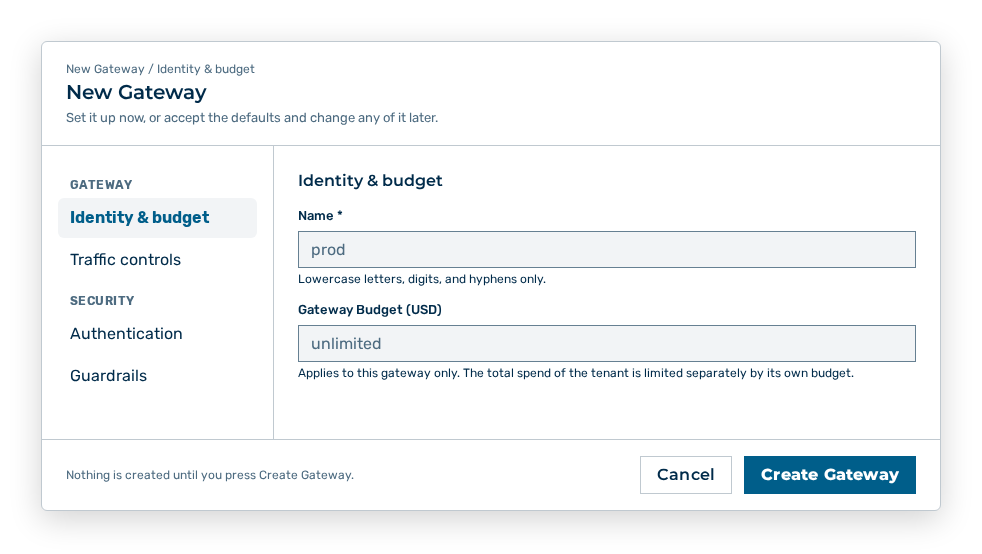
New Gateway dialog
- ► In the Identity & budget section, enter the identifier of the gateway in Name *.
- ■ The identifier contains lowercase letters, numbers, and hyphens.
- ► Set the budget in the same section.
- ► In the navigation bar, open the Traffic controls section.
- ↳ The Traffic controls section opens.
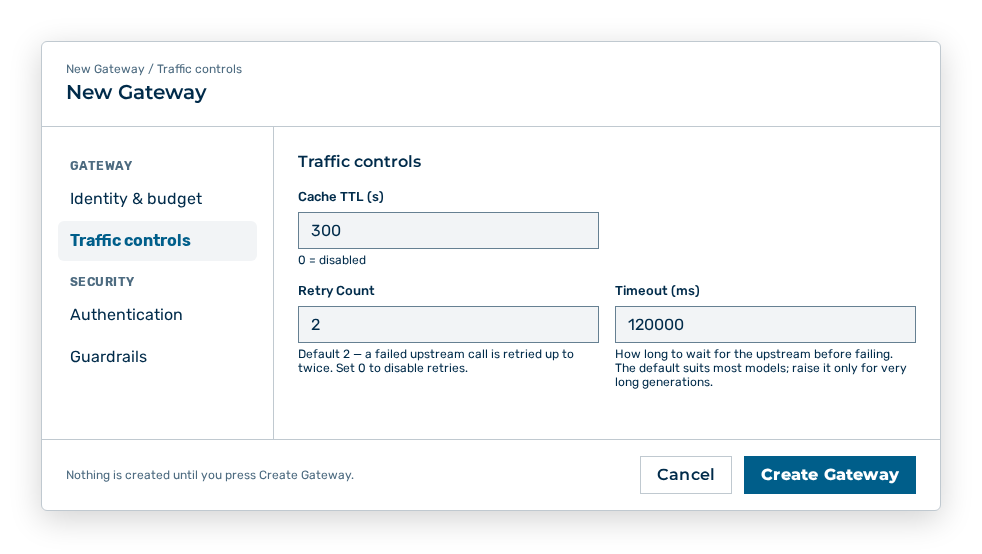
Traffic controls section
- ► Set the cache, the retries, and the timeout.
- ► Open the Authentication section.
- ↳ The Authentication section opens.
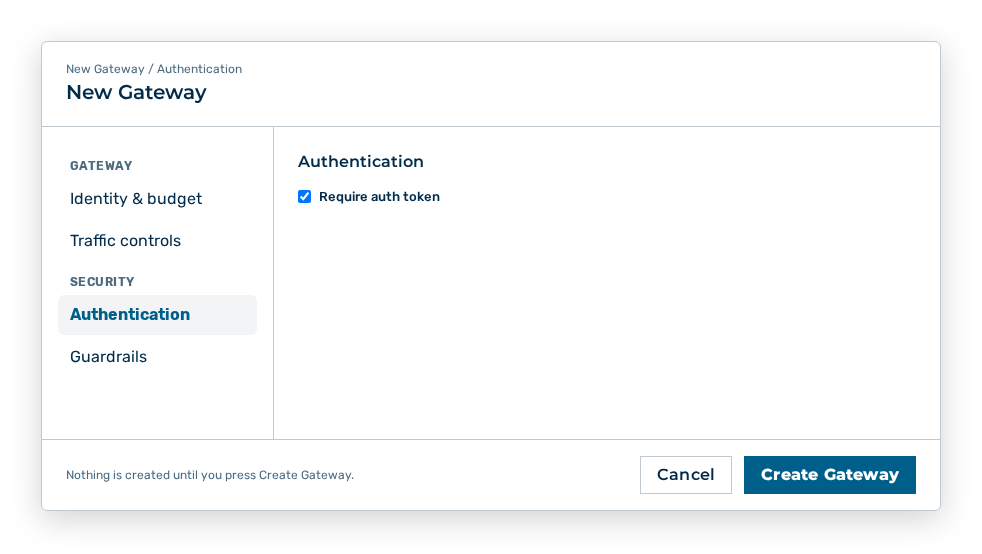
Authentication section
- ► Set whether the gateway requires an authentication token.
- ► Open the Guardrails section.
- ↳ The Guardrails section opens.
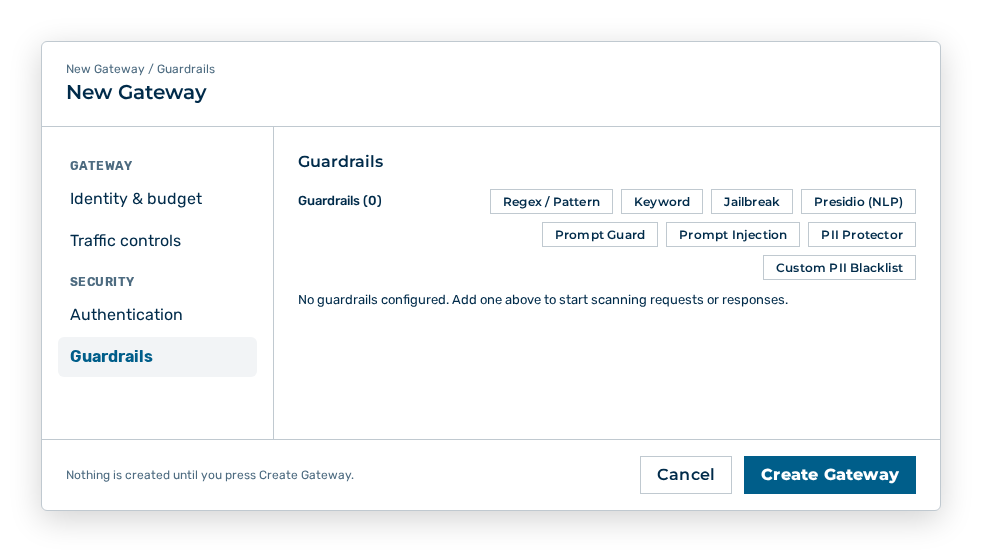
Guardrails section
- ► Add the detectors.
- ► Click on the Create Gateway button.
- ➔ Myra AI Workspace creates the gateway.
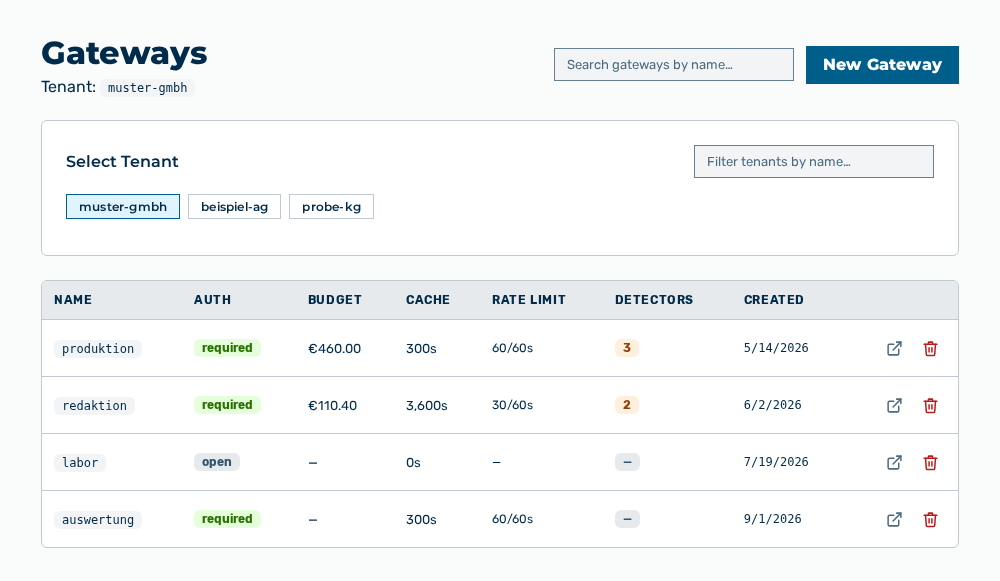
Gateways view with the new gateway
Entries in the New Gateway dialog
New Gateway dialog
The dialog divides the entries into four sections. The navigation bar on the left shows them in two groups:
| Group | Section | Entries |
|---|---|---|
| Gateway | Identity & budget | Name *, Gateway Budget (USD) |
| Gateway | Traffic controls | Cache TTL (s), Retry Count, Timeout (ms) |
| Security | Authentication | Require auth token |
| Security | Guardrails | Guardrails ( |
The header of each section shows the path New Gateway / . Below it, the Identity & budget section shows the note Set it up now, or accept the defaults and change any of it later.
Myra AI Workspace creates the gateway from all four sections in one step. A change of the section saves nothing and discards nothing.
You set the following entries when you create a gateway:
| Entry | Description |
|---|---|
| Name * | Identifier of the gateway, for example prod. Only lowercase letters, numbers, and hyphens are permitted. The identifier is part of the endpoint URL. The entry is required. |
| Gateway Budget (USD) | Spend cap of this gateway. If you leave the field empty, the unlimited entry applies. The budget applies to this gateway only. The tenant's overall spend is capped separately by its own budget. |
| Cache TTL (s) | Lifetime of the cache in seconds. The value 0 disables the cache. |
| Retry Count | Number of retries of a failed call to the provider. The default is 2. The value 0 disables the retries. |
| Timeout (ms) | Time to wait for the provider before the request fails. The default suits most models. Raise it only for very long generations. |
| Require auth token | If the check box is set, every request to the gateway must carry an authentication token. |
| Guardrails ( |
Detectors that examine the requests and the responses of this gateway. With the Regex / Pattern, Keyword, Jailbreak, Presidio (NLP), Prompt Guard, Prompt Injection, PII Protector, and Custom PII Blacklist buttons you add detectors while you create the gateway. As long as no detector exists, the No guardrails configured. Add one above to start scanning requests or responses. entry appears. See the Adding a guardrail detector section. |
The following options are available in the dialog:
| Option | Description |
|---|---|
| Create Gateway button | Creates the gateway. While the gateway is created, the button shows the Creating… label. |
| Cancel button | Closes the dialog without creating the gateway. |
Note
The footer of the dialog shows the note Nothing is created until you press Create Gateway. If the Name * field stays empty, the dialog goes back to the Identity & budget section.
Note
You set all further settings — rate limit, circuit breaker, webhook, SIEM, web search, image generation, prompt caching, compaction, tools, and tracing — in the Edit Gateway dialog after you create the gateway. Afterwards you no longer change the guardrails in this dialog, but in the Guardrails section of the detail view of the gateway.
Enabling a model on a gateway
Proceed as follows to enable a model on a gateway:
Gateways view
-
► In the Settings area, open the Gateways entry.
- ▷ On the start page, click on your name at the bottom of the navigation bar.
- ↳ The user menu opens.
User menu
- ▷ In the My Account group, click on the Settings entry.
- ↳ The navigation bar shows the Settings area. The Gateways entry is open.
Navigation bar in the Settings area
-
► Open the gateway.
- ↳ The detail view of the gateway opens.
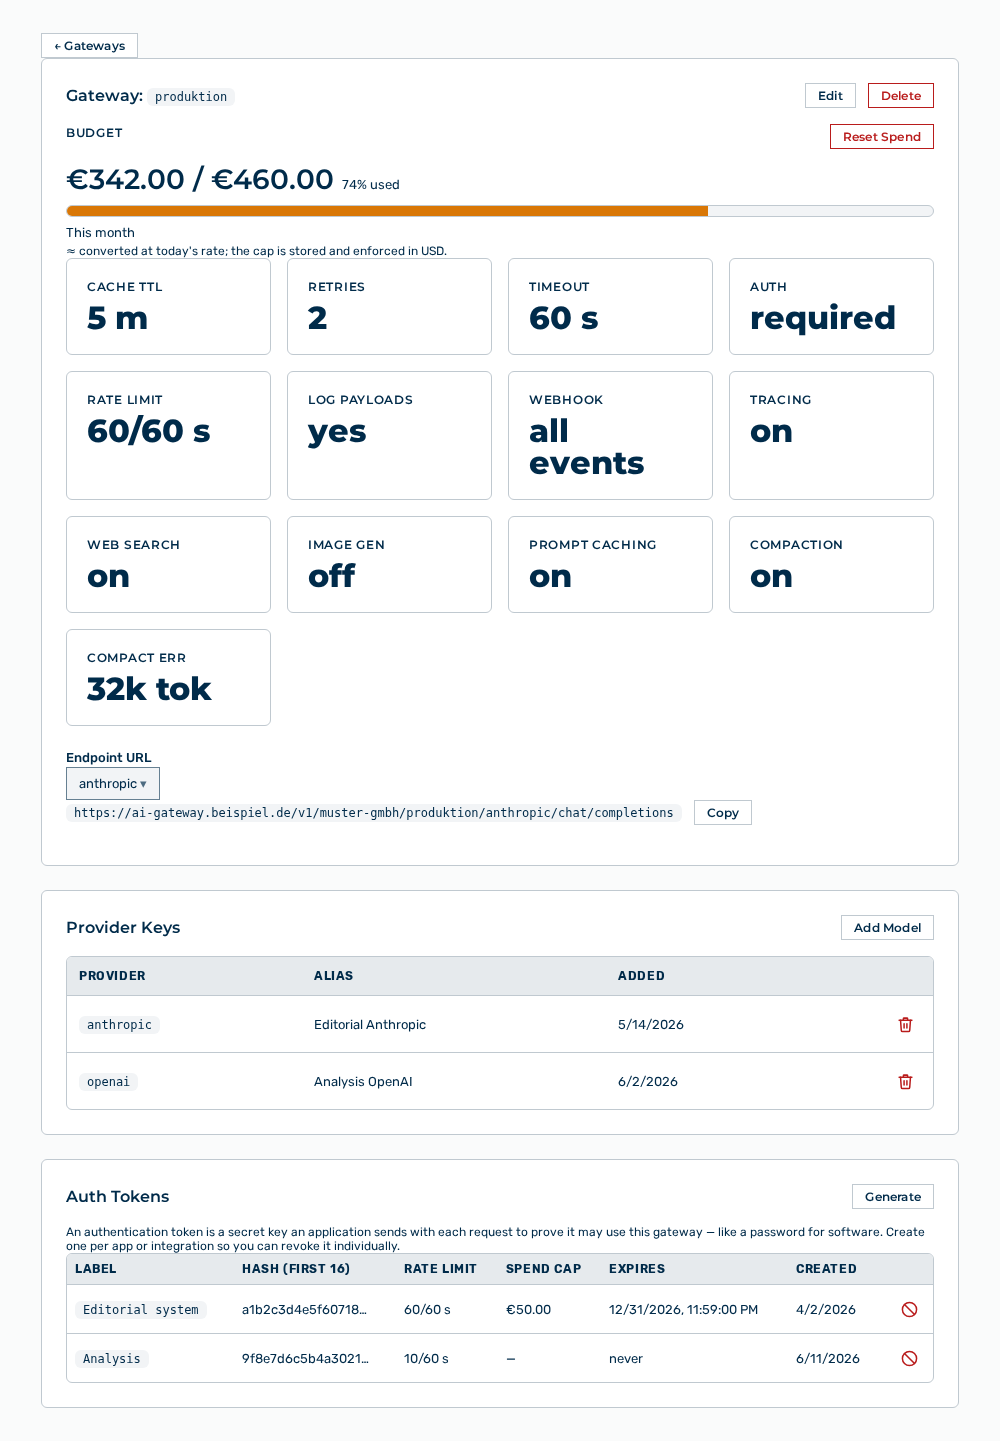
Detail view of a gateway
- ► Click on the Add Model button.
- ↳ The Add Model dialog opens.
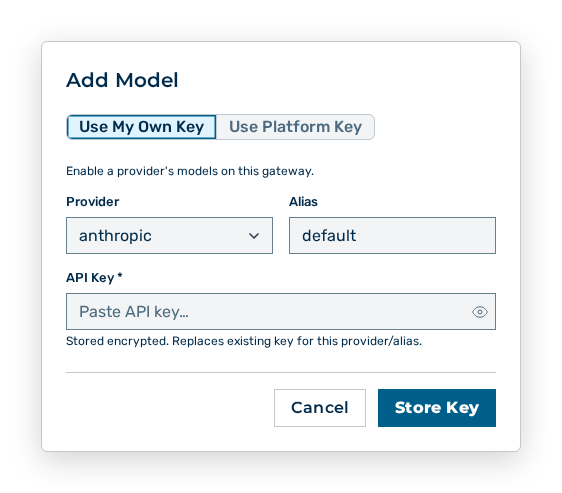
Add Model dialog
- ► Select the method Use My Own Key or Use Platform Key.
- ► Select the Provider.
- ► For your own key, enter the API Key.
- ► Optionally, give an Alias.
- ► Click on the Enable button at the model you want.
- ➔ Myra AI Workspace shows Key stored and encrypted successfully. The model is available for selection in the chat.
Detail view of a gateway
Note
A model made available through the platform key carries the Billed to your plan / trial budget mark.
Entries in the Add Model dialog
Add Model dialog
You set the following entries when you enable a model:
| Entry | Description |
|---|---|
| How to add a model | Sets the key the model runs with: Use My Own Key or Use Platform Key. |
| Provider | Provider whose models the gateway is to reach, for example anthropic or openai. |
| Alias | Label of the key, for example default. The alias distinguishes several keys of the same provider. |
| API Key | Key of the provider. Myra AI Workspace stores it encrypted and thereby replaces an existing key for the same provider and alias. Most providers expect the key as a single character string. AWS Bedrock expects the credentials separated by colons in the form ACCESS_KEY_ID:SECRET_ACCESS_KEY or ACCESS_KEY_ID:SECRET_ACCESS_KEY:SESSION_TOKEN. Vertex AI expects the JSON key of a Google Cloud service account. Some providers need no key. Then the dialog shows This provider does not require an API key. |
The following options are available in the dialog:
| Option | Description |
|---|---|
| Show button | Shows the API key you entered as plain text. When the key is shown, the button carries the Hide label. |
| Store Key button | Stores the key encrypted. While the key is stored, the button shows the Storing… label. |
| Enable button | Enables the model of the row on this gateway. For an enabled model, the button carries the Disable label. |
| Cancel button | Closes the dialog. |
Note
A model provided through the platform key is usable only once the workspace has a budget. If no models are available, the dialog shows No Myra-provided models are available.
Note
Several keys of the same provider exist next to each other on one gateway under different aliases. If you store a key again for the same provider and alias, it replaces the previous key. Thus you exchange a key without an interruption. A request selects an alias other than default with the x-aig-byok-alias header. If the specified alias does not exist, the gateway rejects the request with a configuration error. The gateway does not fall back to the default alias.
Deleting a provider key
A deleted provider key cannot be restored. Requests that resolve to this provider and alias fail until a new key is stored.
Proceed as follows to delete a provider key:
Gateways view
-
► In the Settings area, open the Gateways entry.
- ▷ On the start page, click on your name at the bottom of the navigation bar.
- ↳ The user menu opens.
User menu
- ▷ In the My Account group, click on the Settings entry.
- ↳ The navigation bar shows the Settings area. The Gateways entry is open.
Navigation bar in the Settings area
-
► Open the gateway.
- ↳ The detail view of the gateway opens.
Detail view of a gateway
- ► In the Provider Keys area, click on the Delete row action of the key.
- ↳ The Delete key for
/ query opens.? Routing to this provider will fail.
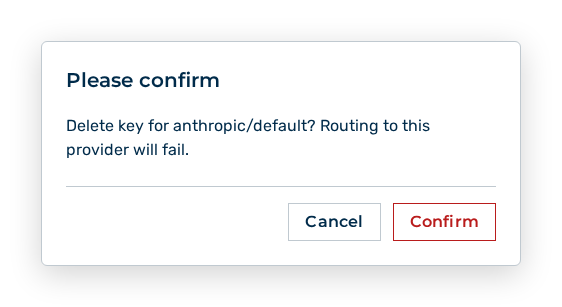
Delete key query
- ► Confirm the query.
- ➔ Myra AI Workspace removes the key from the Provider Keys area.
Detail view of a gateway
Effects of the deletion of a key
The deletion has the following effects:
| Object | Effect |
|---|---|
| Key | Myra AI Workspace removes the key immediately. The deletion cannot be undone. |
| Requests | Requests that resolve to this provider and alias fail until a new key is stored. The gateway does not fall back to a different alias. |
| Other aliases | The other keys of the same provider remain. A request reaches them with the x-aig-byok-alias header. |
| Keys of the tenant | A key stored on the tenant does not step in. The key serves the administration and the analysis of the usage data, not the answering of requests. |
Attention
The deletion of the key with the default alias makes every request fail that specifies no alias.
The following options are available in the query:
| Option | Description |
|---|---|
| Confirm button | Deletes the key. |
| Cancel button | Closes the query without deleting the key. |
Editing a gateway
Proceed as follows to edit a gateway:
Gateways view
-
► In the Settings area, open the Gateways entry.
- ▷ On the start page, click on your name at the bottom of the navigation bar.
- ↳ The user menu opens.
User menu
- ▷ In the My Account group, click on the Settings entry.
- ↳ The navigation bar shows the Settings area. The Gateways entry is open.
Navigation bar in the Settings area
-
► Open the gateway.
- ↳ The detail view of the gateway opens.
Detail view of a gateway
- ► Click on the Edit button.
- ↳ The Edit Gateway:
dialog opens.
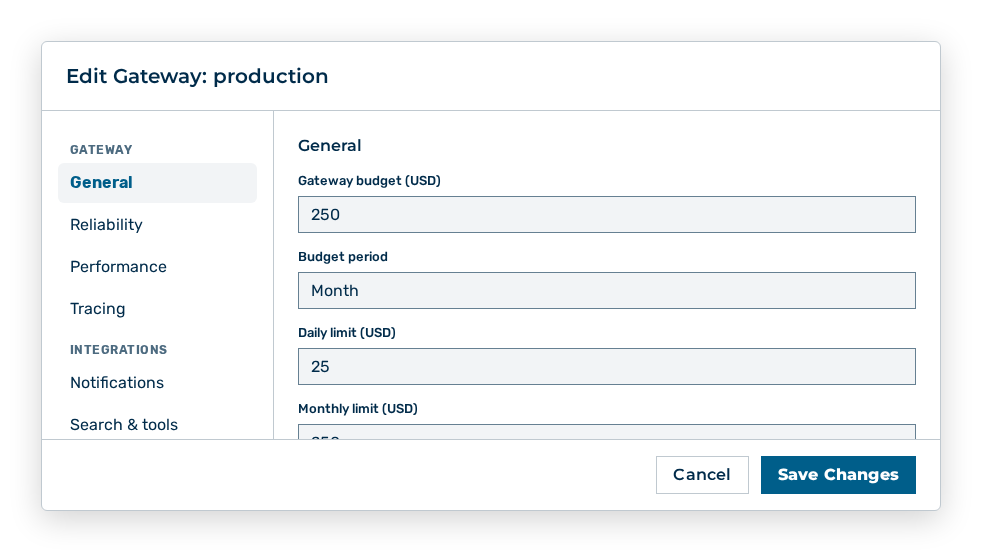
Edit Gateway dialog
- ► In the General section, change the budget, the limits, the EU routing, or the URL overrides of the providers.
- ■ You open the remaining sections through the navigation bar on the left.
- ► Click on the Save Changes button.
- ➔ Myra AI Workspace applies the change for the next request.
Detail view of a gateway
Entries in the Edit Gateway dialog
Edit Gateway dialog
The dialog divides the entries into six sections. The navigation bar on the left shows them in two groups:
| Group | Section | Content |
|---|---|---|
| Gateway | General | Budget, cache, retries, timeout, rate limit, authentication, logging, EU routing, and the provider base URLs |
| Gateway | Reliability | Circuit breaker |
| Gateway | Performance | Anthropic prompt caching, context compaction, and the compact error threshold |
| Gateway | Tracing | Request tracing |
| Integrations | Notifications | Webhook and SIEM integration |
| Integrations | Search & tools | Web search, image generation, and tools & access |
Myra AI Workspace saves the entries of all six sections together. A change of the section saves nothing and discards nothing.
You change the following entries in the General section:
| Entry | Effect of the change |
|---|---|
| Gateway Budget (USD) | Sets the spend cap of this gateway. When the cap is reached, the gateway rejects further requests. |
| Budget Period | Sets what the cap refers to: Monthly, Daily, or Lifetime. |
| Cache TTL (s) | Changes the lifetime of the cache. The value 0 disables the cache. |
| Retry Count | Changes the number of retries of a failed call to the provider. |
| Timeout (ms) | Changes the time to wait for the provider. A value that is too small aborts long generations. |
| Rate Limit (req) and Rate Window (s) | Limit the requests per time window. The gateway rejects requests beyond that. |
| Require auth token | If the check box is not set, the gateway accepts requests without a token. |
| Log request/response payloads | If the check box is set, Myra AI Workspace stores the payloads of the requests and responses in the request log. |
| EU routing | With the Route to EU-region providers only check box, Myra AI Workspace restricts this gateway to provider endpoints in the EU region for commercial models. |
| Provider Base URLs | Overrides the upstream URL for a provider, for example for a self-hosted OpenAI-compatible endpoint. The Add URL override button adds a row, the Remove button deletes it. |
Note
If your organisation enforces EU routing platform-wide, it applies to this gateway independently of this entry. The entry raises the gateway to EU routing, it never lowers it below the floor of the organisation.
You change the following entries in the Reliability section:
| Entry | Effect of the change |
|---|---|
| Circuit Breaker | Stops the routing to a provider after repeated failures and probes again after a cooldown. The Enable circuit breaker check box switches it on. The Failure threshold (default 5), Window (s) (default 60), and Cooldown (ms) (default 30000) entries set when the circuit breaker opens and when it probes again. |
You change the following entries in the Performance section:
| Entry | Effect of the change |
|---|---|
| Anthropic Prompt Caching | Sets a cache breakpoint on the system prompt so that Anthropic reuses cached tokens across turns. The Cache TTL is 5 minutes (1.25× write cost) or 1 hour (2× write cost). The setting applies to Anthropic models only. |
| Context Compaction (Anthropic) | Summarises the conversation history as soon as the input tokens exceed the Threshold (tokens). The default is 200 000 tokens. The Keep last N turns verbatim entry sets how many turns stay uncompacted. |
| Compact error threshold (tokens) | Returns a context too long error to the client as soon as the estimated number of input tokens exceeds this value. If you leave the field empty, the response is disabled. |
You change the following entries in the Tracing section:
| Entry | Effect of the change |
|---|---|
| Request Tracing | Records a full step-by-step trace for every request. The Enable request tracing check box switches the recording on. |
| Include message bodies in trace (privacy-sensitive — off by default) | Includes the bodies of the messages in the trace. The check box is not set in the delivery state. |
| Retention (hours) | Sets how long the traces are kept (1 to 720). |
You change the following entries in the Notifications section:
| Entry | Effect of the change |
|---|---|
| Webhook | Sends HTTP POST notifications on gateway events to the URL you enter. If you leave the URL empty, the webhook is disabled. A signing secret adds the X-AIG-Signature header. |
| SIEM Integration | Streams security events to an external SIEM and thereby overrides any SIEM configuration at tenant level. The Events to forward selection sets which events the gateway sends. The all (every request) entry sends every request. The — disabled — entry switches the streaming off. |
You change the following entries in the Search & tools section:
| Entry | Effect of the change |
|---|---|
| Web Search | Enables the server-side web search for all requests on this gateway. The Search provider is Brave — US or Linkup — EU. Without a selection, the tenant default applies. If the gateway enforces EU data residency, Linkup — EU is required. Without an API key of the search provider, the web search cannot be enabled. |
| Image Generation | Lets the assistant create images on request through the generate_image tool. The image model is a self-hosted EU model. The default is flux.2-dev. |
| Tools & Access | Groups the IP allowlist, the code interpreter, the agentic web fetch, the malware scan of the uploads, and the maximum number of parallel tool calls. See the following table. |
You change the following entries in the Tools & Access group of the Search & tools section:
| Entry | Effect of the change |
|---|---|
| IP allowlist | Restricts the inference to the source IP ranges you enter in CIDR notation, for example 10.0.0.0/8 or 2001:db8::/32. An empty list allows all source IP addresses. The list applies to the inference only, not to the admin API. |
| Enable code interpreter | Lets the assistant run code. With Persistent kernel (stateful), the variables are kept across turns. |
| Enable agentic web fetch | Lets the assistant fetch web pages on its own. |
| Scan uploads for malware (ClamAV) | Scans files that are uploaded to this gateway before they are processed. The gateway rejects infected or unscannable files. The scan requires a provisioned ClamAV service. |
| Max parallel tool calls | Limits the tool calls per round. If you leave the field empty, the default 4 applies. |
The following options are available in the dialog:
| Option | Description |
|---|---|
| Save Changes button | Applies the changes. While the changes are saved, the button shows the Saving… label. |
| Cancel button | Closes the dialog without applying the changes. |
Note
If an entry of the IP allowlist is not a valid CIDR notation, the dialog shows Invalid CIDR:
Creating an auth token
An auth token identifies an application to the gateway. Create one token per application so that you can revoke it individually.
The following requirements are met:
- ☑ Your user account has the Administrator or Tenant Administrator role.
Proceed as follows to create an auth token:
Gateways view
-
► In the Settings area, open the Gateways entry.
- ▷ On the start page, click on your name at the bottom of the navigation bar.
- ↳ The user menu opens.
User menu
- ▷ In the My Account group, click on the Settings entry.
- ↳ The navigation bar shows the Settings area. The Gateways entry is open.
Navigation bar in the Settings area
-
► Open the gateway.
- ↳ The detail view of the gateway opens.
Detail view of a gateway
- ► In the Auth Tokens section, click on the Generate button.
- ↳ The Create Auth Token dialog opens.
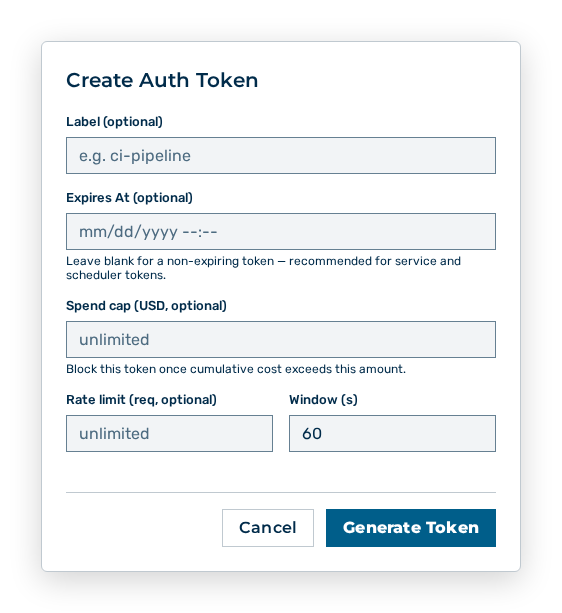
Create Auth Token dialog
- ► Enter the label.
- ► If necessary, set the expiry, the spend cap, and the rate limit.
- ► Click on the Generate Token button.
- ➔ Myra AI Workspace creates the token and shows it once in the Token Created dialog.
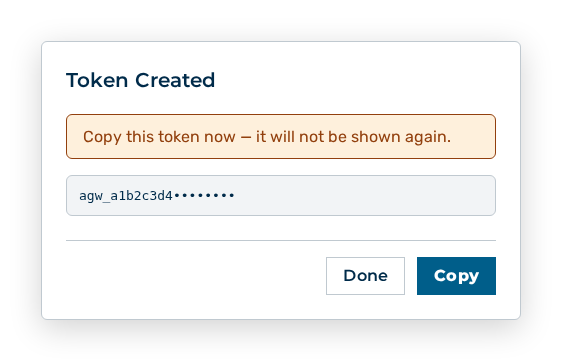
Token Created dialog
Note
A token always applies to exactly one gateway. The section carries the hint An authentication token is a secret key an application sends with each request to prove it may use this gateway — like a password for software. Create one per app or integration so you can revoke it individually.
Entries in the Create Auth Token dialog
Create Auth Token dialog
You set the following entries at creation:
| Entry | Description |
|---|---|
| Label (optional) | Label of the token, for example ci-pipeline. The label appears in the Label column of the section. Without a label, the section lists the token under the first 16 characters of its hash value. |
| Expires At (optional) | Time at which the token loses its validity. The field carries the hint Leave blank for a non-expiring token — recommended for service and scheduler tokens. If you set an expiry, the owner is warned (in-app and by email) 7 days before it lapses. |
| Spend cap (USD, optional) | Amount above which Myra AI Workspace blocks the token. The field carries the hint Block this token once cumulative cost exceeds this amount. An empty field means: unlimited. |
| Rate limit (req, optional) and Window (s) | Limit the requests with this token per time window. An empty Rate limit (req, optional) field means: unlimited. The Window (s) field carries the value 60. |
The following options are available in the dialog:
| Option | Description |
|---|---|
| Generate Token button | Creates the token and shows it once. During the creation, the button shows Generating…. |
| Copy button | Copies the token shown to the clipboard. After the copy, the button shows Copied!. A click on the token itself does the same. |
| Done button | Closes the Token Created dialog. |
| Cancel button | Closes the dialog without creating a token. |
Note
Myra AI Workspace shows the token only immediately after the creation. The dialog carries the hint Copy this token now. It will not be shown again. Copy the token before you close the dialog.
Editing an auth token
You change the spend cap, the rate limit, and the expiry of an existing token without revoking the token. The token itself stays valid. An application that is already set up continues to work.
The following requirements are met:
- ☑ Your user account has the Administrator or Tenant Administrator role.
- ☑ At least one auth token exists for the gateway.
Proceed as follows to edit an auth token:
Gateways view
-
► In the Settings area, open the Gateways entry.
- ▷ On the start page, click on your name at the bottom of the navigation bar.
- ↳ The user menu opens.
User menu
- ▷ In the My Account group, click on the Settings entry.
- ↳ The navigation bar shows the Settings area. The Gateways entry is open.
Navigation bar in the Settings area
-
► Open the gateway.
- ↳ The detail view of the gateway opens.
Detail view of a gateway
- ► In the Auth Tokens section, click on the Edit row action at the token.
- ↳ The Edit Token — dialog opens with the current entries.
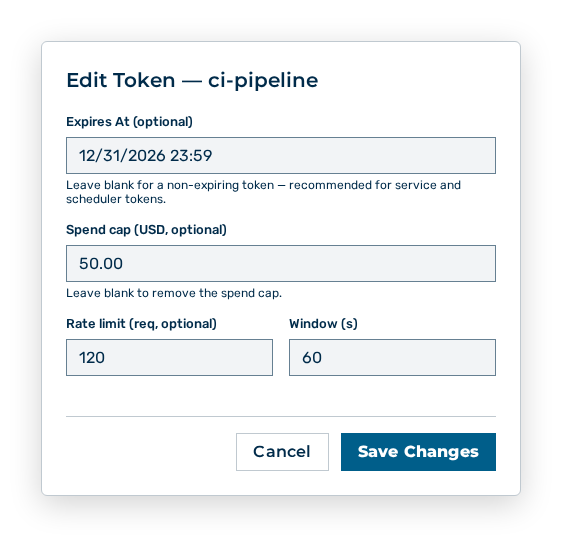
Edit Token dialog
- ► Change the data.
- ► Click on the Save Changes button.
- ➔ Myra AI Workspace applies the entries. The Auth Tokens section shows the changed values.
Detail view of a gateway
Note
Without a label, the dialog carries the first 16 characters of the hash value instead of the label, for example Edit Token — a1b2c3d4e5f60718…
Entries in the Edit Token dialog
Edit Token dialog
You change the following entries:
| Entry | Effect of the change |
|---|---|
| Expires At (optional) | Moves the time at which the token loses its validity. If you empty the field, the token no longer expires. The Expires column then shows never. |
| Spend cap (USD, optional) | Changes the amount above which Myra AI Workspace blocks the token. The field carries the hint Leave blank to remove the spend cap. If you empty the field, requests with this token consume without a limit. |
| Rate limit (req, optional) and Window (s) | Change the permitted requests per time window. If you empty the Rate limit (req, optional) field, the rate limit of the token no longer applies. |
The following entries cannot be changed in this dialog:
| Entry | Description |
|---|---|
| Label | Label of the token. The label is fixed at creation. |
| Hash (first 16) | Hash value of the token. The hash value is fixed at creation. |
| Gateway | A token always applies to exactly the gateway that you created it for. |
The following options are available in the dialog:
| Option | Description |
|---|---|
| Save Changes button | Applies the changed entries. During the save, the button shows Saving…. |
| Cancel button | Closes the dialog without changing the entries. |
Effects of the changes
The change has the following effects:
| Object | Effect |
|---|---|
| Token | The token itself stays valid without a change. An application that uses it continues to work unchanged. |
| Requests | The new limits apply from the next request. A lowered spend cap and a lowered rate limit take effect immediately. |
| Consumption so far | The recorded costs of the token remain. If the consumption so far already exceeds the new spend cap, Myra AI Workspace blocks the token. |
Revoking an auth token
A revoked token cannot be restored. Applications that use it receive no answer any more.
Proceed as follows to revoke an auth token:
Gateways view
-
► In the Settings area, open the Gateways entry.
- ▷ On the start page, click on your name at the bottom of the navigation bar.
- ↳ The user menu opens.
User menu
- ▷ In the My Account group, click on the Settings entry.
- ↳ The navigation bar shows the Settings area. The Gateways entry is open.
Navigation bar in the Settings area
-
► Open the gateway.
- ↳ The detail view of the gateway opens.
Detail view of a gateway
- ► In the Auth Tokens section, click on the Revoke row action at the token.
- ↳ The Delete this token? Requests using it will fail. query opens.
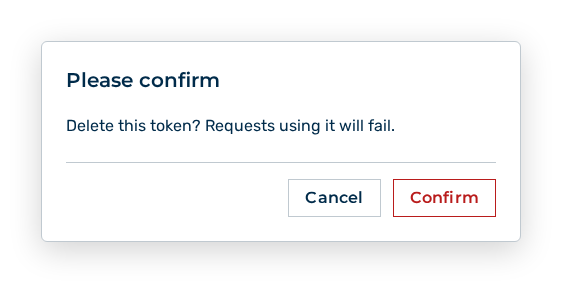
Delete token query
- ► Confirm the query.
- ➔ Myra AI Workspace removes the token from the Auth Tokens section.
Detail view of a gateway
Effects of the revocation
The revocation has the following effects:
| Object | Effect |
|---|---|
| Token | Myra AI Workspace removes the token from the section. The revocation cannot be undone. |
| Requests | The gateway answers requests with this token with Missing or invalid gateway token. |
| Spend cap and rate limit | The entries of the token are removed with the token. A new token gets its own entries. |
| Gateway | The gateway remains. The other tokens of the gateway stay valid. |
The following options are available in the query:
| Option | Description |
|---|---|
| Confirm button | Revokes the token. |
| Cancel button | Closes the query without revoking the token. |
Deleting a gateway
Proceed as follows to delete a gateway:
Gateways view
-
► In the Settings area, open the Gateways entry.
- ▷ On the start page, click on your name at the bottom of the navigation bar.
- ↳ The user menu opens.
User menu
- ▷ In the My Account group, click on the Settings entry.
- ↳ The navigation bar shows the Settings area. The Gateways entry is open.
Navigation bar in the Settings area
-
► Delete the gateway.
- ↳ The Delete gateway "
"? This cannot be undone. query opens.
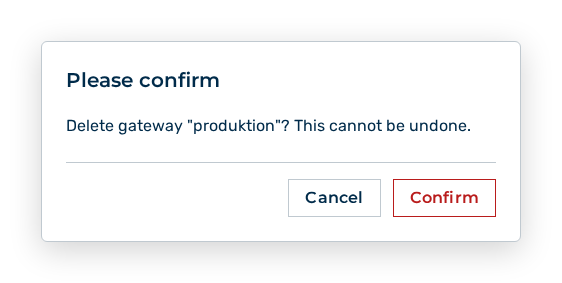
Delete gateway query
- ► Confirm the query.
- ➔ Myra AI Workspace deletes the gateway. The tokens of this gateway lose their validity.
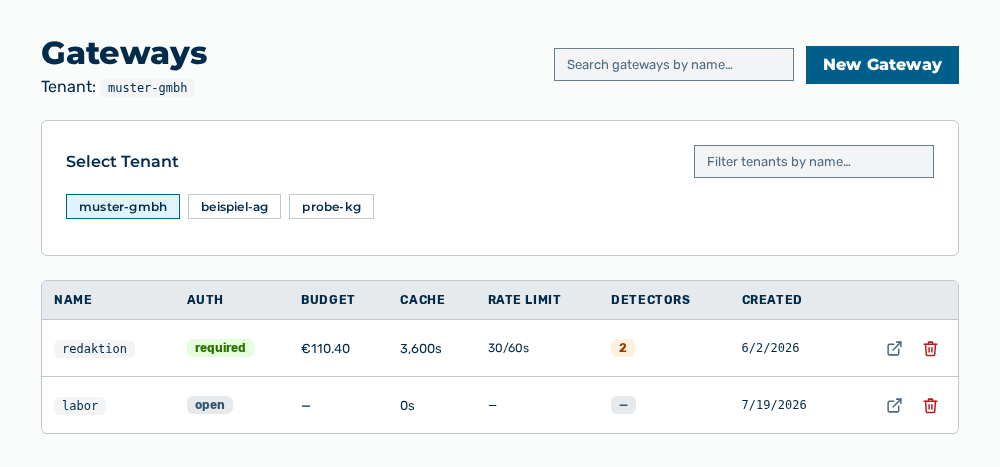
Gateways view without the gateway
Effects of the deletion
The deletion has the following effects:
| Object | Effect |
|---|---|
| Gateway | Myra AI Workspace deletes the gateway permanently. The endpoint URL is no longer reachable afterwards. |
| Auth tokens | The tokens of this gateway lose their validity. Requests with these tokens fail. |
| Provider keys | The keys stored on the gateway are removed with the gateway. |
| Routing rules and guardrails | The rules and the selection of the detectors are removed with the gateway. |
Note
The deletion cannot be undone. Create a gateway with the same name again if you need the identifier once more.