Managing tenants
A tenant is the highest unit of Myra AI Workspace. The tenant holds the gateways, the user accounts, and the cost of an organization.
Creating a tenant
The following requirements are met:
- ☑ Your user account has the Create tenants permission.
Proceed as follows to create a tenant:
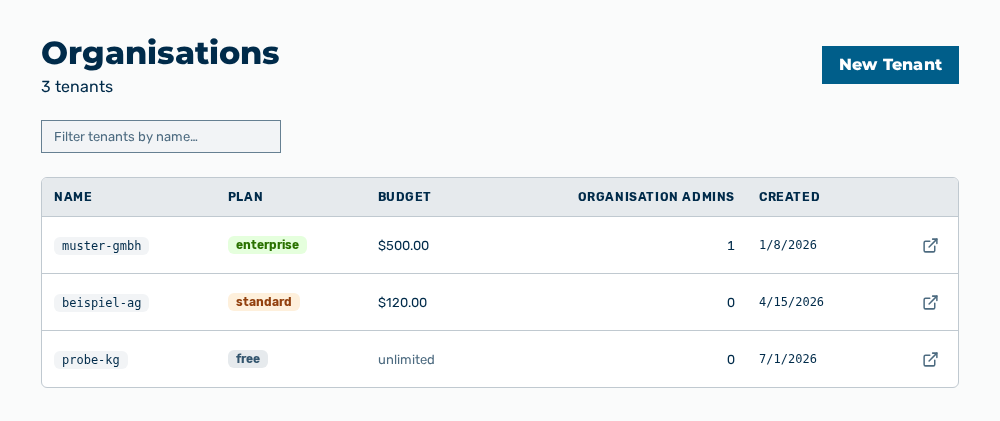
Organisations view
-
► In the User Management area, open the Organisations tab.
- ▷ On the start page, click on your name at the bottom of the navigation bar.
- ↳ The user menu opens.
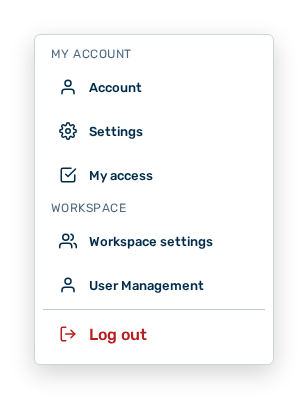
User menu
- ▷ In the Workspace group, click on the User Management entry.
- ↳ The navigation bar shows the User Management area. The Members tab is open.
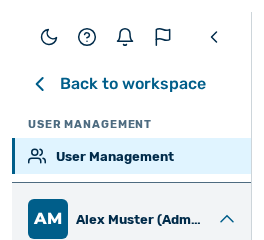
Navigation bar in the User Management area
- ▷ Open the Organisations tab.
- ► Click on the New Tenant button.
- ↳ The New Tenant dialog opens.
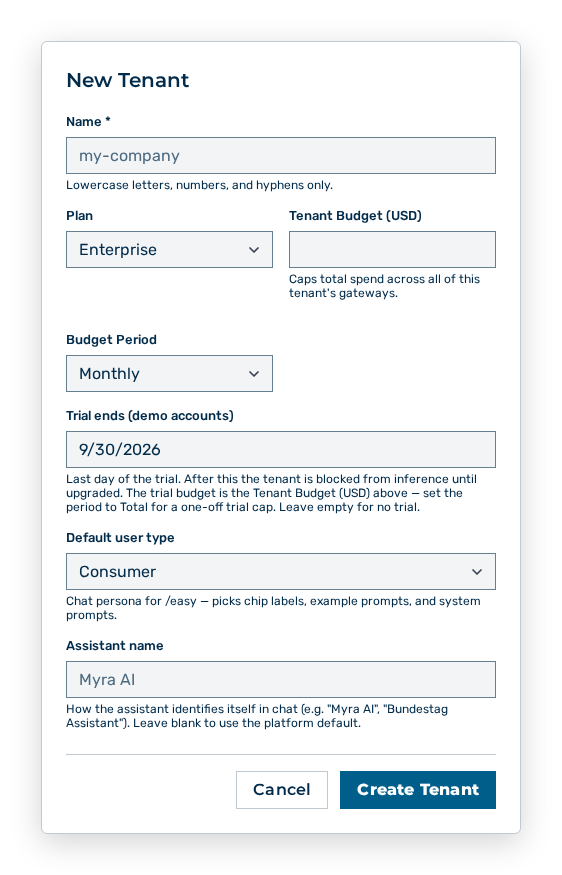
New Tenant dialog
- ► In Name, enter the identifier of the tenant.
- ■ The identifier contains lowercase letters, numbers, and hyphens.
- ► Select the plan.
- ► Set the tenant budget and the budget period.
- ► If necessary, set the end of the trial, the default user type, and the assistant name.
- ► Click on the Create Tenant button.
- ➔ Myra AI Workspace creates the tenant. Then you create its gateways and user accounts.
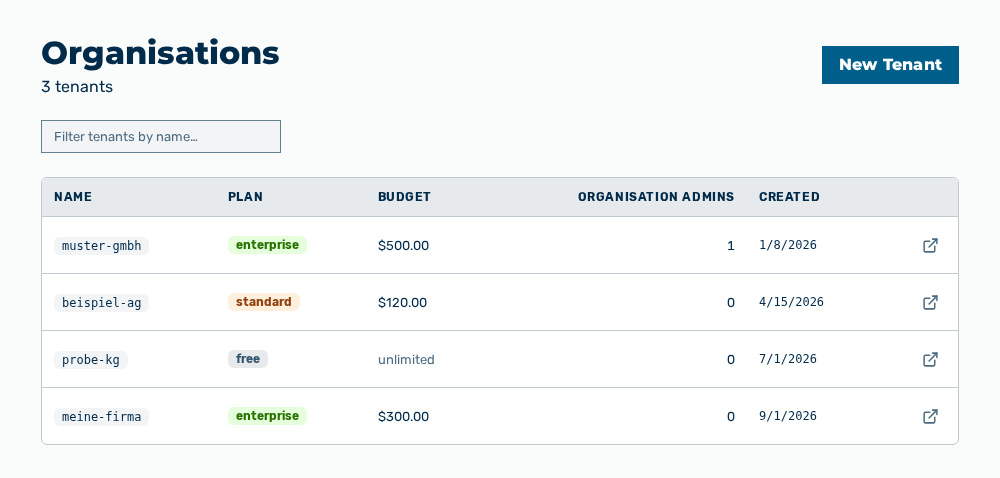
Organizations view with the new tenant
Note
The identifier in Name cannot be changed after the creation. The identifier is part of every address of a gateway of this tenant.
Entries in the New Tenant dialog
New Tenant dialog
You define the following entries in the New Tenant dialog:
| Entry | Description |
|---|---|
| Name * | Identifier of the tenant, for example my-company. Only lowercase letters, numbers, and hyphens are permitted. The entry is required. |
| Plan | Plan of the tenant: Free, Standard, or Enterprise. |
| Tenant Budget (USD) | Spending limit across all gateways of this tenant. If you leave the field empty, then the unlimited entry applies. |
| Budget Period | Period of the limit: Monthly, Daily, or Total. |
| Trial ends (demo accounts) | Last day of the trial. After that the tenant is blocked from inference until it is upgraded. The trial budget is the tenant budget. For a one-off trial limit, set the budget period to Total. If you leave the field empty, then no trial applies. |
| Code interpreter file size limit (MiB) | Largest single file that the code interpreter may deliver to this tenant. The default is 4. Values from 4 to 25 are permitted. Only platform administrators change this entry. |
| Default user type | Chat persona of the tenant. The persona determines the labels, the example prompts, and the system prompts of the simplified chat. |
| Assistant name | Name the assistant uses for itself in the chat. If you leave the field empty, then the platform default applies. |
The following options are available in the dialog:
| Option | Description |
|---|---|
| Create Tenant button | Creates the tenant. During the creation, the button carries the Creating… label. |
| Cancel button | Closes the dialog without creating the tenant. If unsaved changes exist, then the Discard changes? prompt opens. |
Note
If the trial date is in the past, then the dialog reports This date is in the past — the tenant is blocked from inference immediately. If a trial is set without a budget, then the dialog reports This trial has a time limit but no spend cap. Set a Tenant Budget (USD) above to cap trial spend.
Editing a tenant
Proceed as follows to edit a tenant:
Organisations view
-
► In the User Management area, open the Organisations tab.
- ▷ On the start page, click on your name at the bottom of the navigation bar.
- ↳ The user menu opens.
User menu
- ▷ In the Workspace group, click on the User Management entry.
- ↳ The navigation bar shows the User Management area. The Members tab is open.
Navigation bar in the User Management area
- ▷ Open the Organisations tab.
- ► Open the tenant.
- ↳ The detail view of the tenant opens.
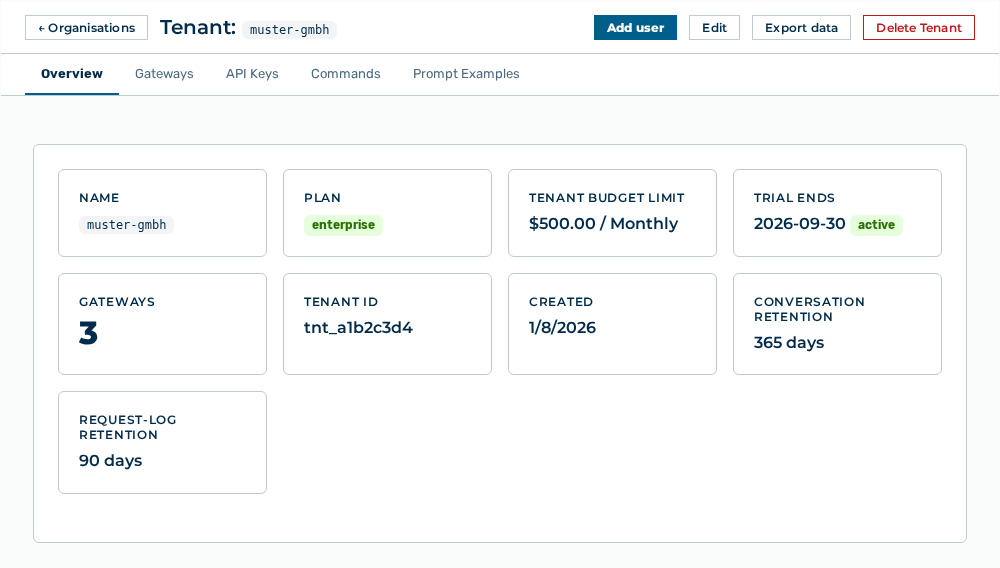
Detail view of a tenant
- ► Click on the Edit button.
- ↳ The Edit:
dialog opens.
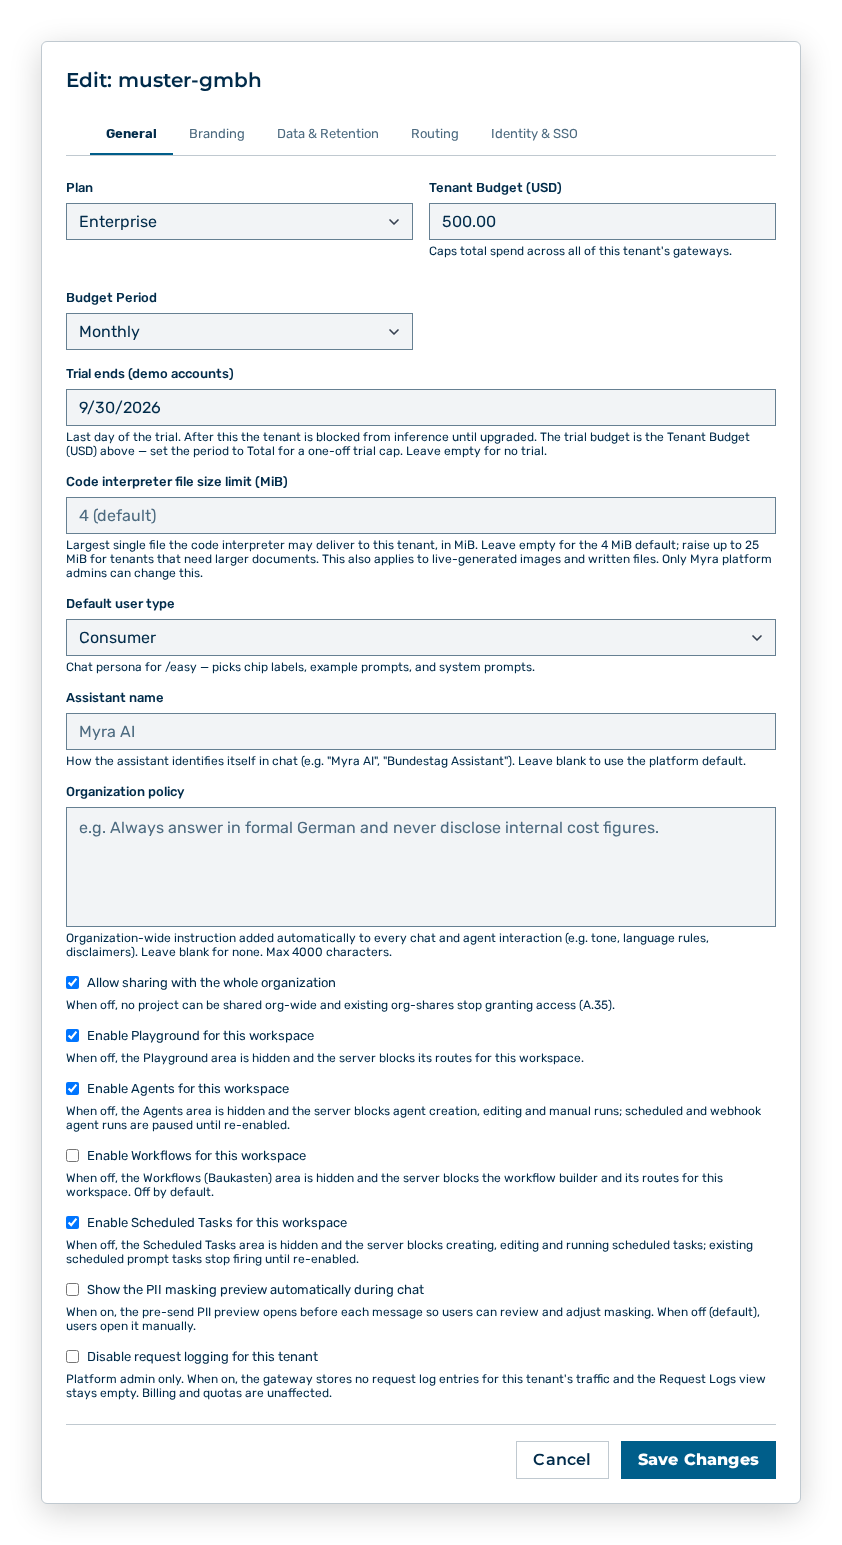
Edit dialog
- ► Change the settings in the General, Branding, Data & Retention, Routing, or Identity & SSO tab.
- ► Click on the Save Changes button.
- ➔ Myra AI Workspace applies the change.
Detail view of a tenant
Entries in the General tab
General tab
The General tab holds the entries of the New Tenant dialog without the identifier in Name. In addition, you change the following entries there:
| Entry | Effect of the change |
|---|---|
| Organization policy | Organization-wide instruction that Myra AI Workspace adds to every chat and agent interaction, for example on tone or language rules. Up to 4000 characters are permitted. |
| Allow sharing with the whole organization | If the check box is not selected, then no project can be shared org-wide, and existing org shares no longer grant access. |
| Enable Playground for this workspace | If the check box is not selected, then the Playground area is hidden, and Myra AI Workspace blocks its addresses for this tenant. |
| Enable Agents for this workspace | If the check box is not selected, then the Agents area is hidden, and scheduled agent runs are paused. |
| Enable Workflows for this workspace | If the check box is not selected, then the Workflows area is hidden. The setting is off by default. |
| Enable Scheduled Tasks for this workspace | If the check box is not selected, then the Scheduled Tasks area is hidden, and existing scheduled tasks no longer run. |
| Show the PII masking preview automatically during chat | If the check box is selected, then the masking preview opens before every message. If it is not selected, then the users open the preview themselves. |
| Disable request logging for this tenant | If the check box is selected, then Myra AI Workspace stores no request logs for this tenant, and the Request Logs view stays empty. Billing and quotas are not affected. Only platform administrators change this entry. |
Entries in the Branding tab
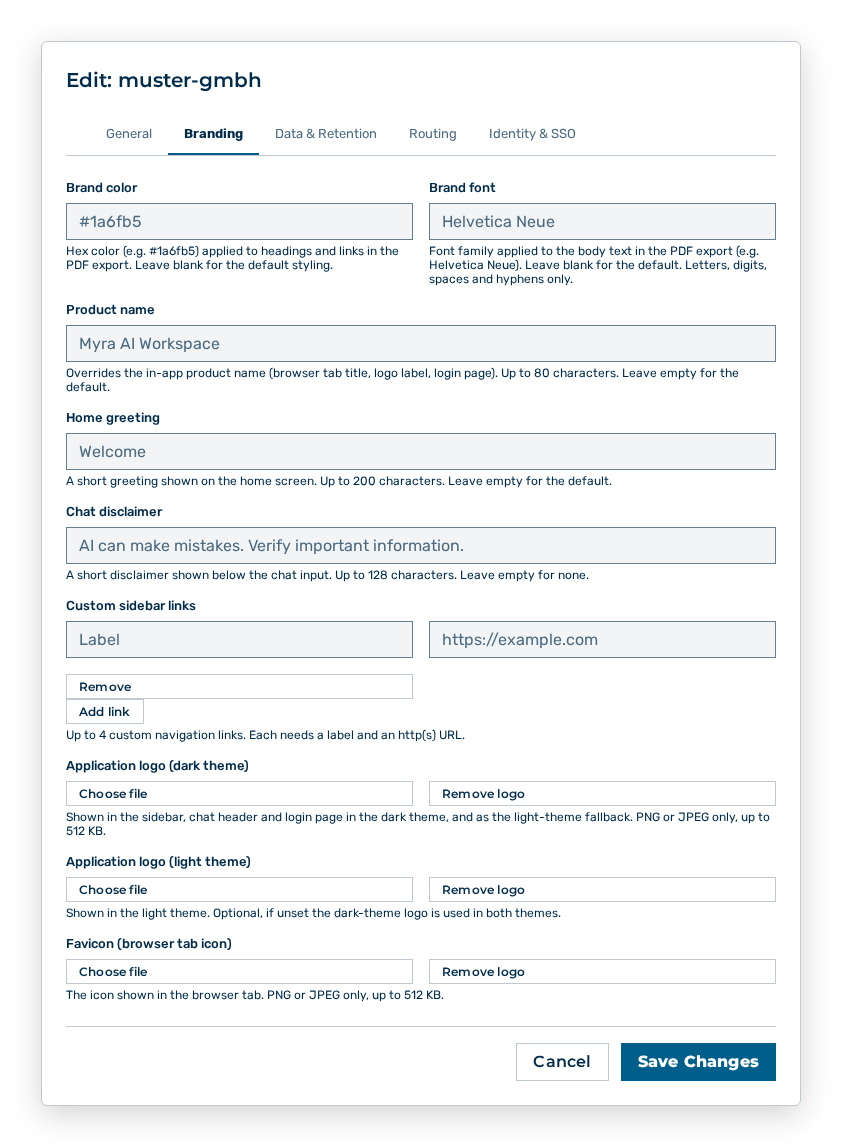
Branding tab
You change the following entries in the Branding tab:
| Entry | Effect of the change |
|---|---|
| Product name | Overrides the product name in the application — the browser tab title, the logo label, and the login page. Up to 80 characters are permitted. |
| Home greeting | Replaces the greeting on the home screen. Up to 200 characters are permitted. |
| Chat disclaimer | Replaces the disclaimer below the chat input. Up to 128 characters are permitted. |
| Custom sidebar links | Adds up to four custom navigation links. Every link needs a Label and a URL with the http or https scheme. |
| Brand color | Colors the headings and links in the PDF export, for example #1a6fb5. |
| Brand font | Sets the font family of the body text in the PDF export, for example Helvetica Neue. Only letters, numbers, spaces, and hyphens are permitted. |
| Application logo (dark theme) | Replaces the default logo in the sidebar, in the chat header, and on the login page. PNG and JPEG up to 512 KB and up to 4000×4000 pixels are permitted. |
| Application logo (light theme) | Replaces the logo in the light theme. Without an entry, the dark-theme logo applies in both themes. |
| Favicon (browser tab icon) | Replaces the icon in the browser tab. A small square PNG works best. |
Note
After the upload, the dialog reports Logo updated., after the removal Logo removed. For a wrong format, the dialog reports Only PNG or JPEG images are allowed., for a file that is too large The image is too large (max 512 KB)., and for dimensions that are too large The image dimensions are too large (max 4000×4000 px).
Entries in the Data & Retention tab
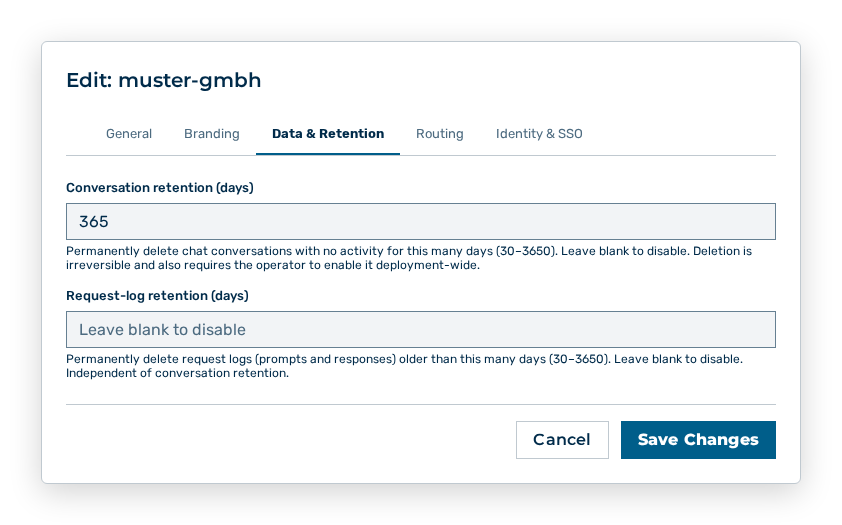
Data & Retention tab
You change the following entries in the Data & Retention tab:
| Entry | Effect of the change |
|---|---|
| Conversation retention (days) | Permanently deletes chat conversations without activity after this many days (30–3650). If you leave the field empty, then the deletion is disabled. |
| Request-log retention (days) | Permanently deletes request logs with prompts and responses after this many days (30–3650). The period is independent of the conversation retention. |
Note
The deletion by a retention period is irreversible and additionally requires the operator to enable it deployment-wide.
Entries in the Routing tab
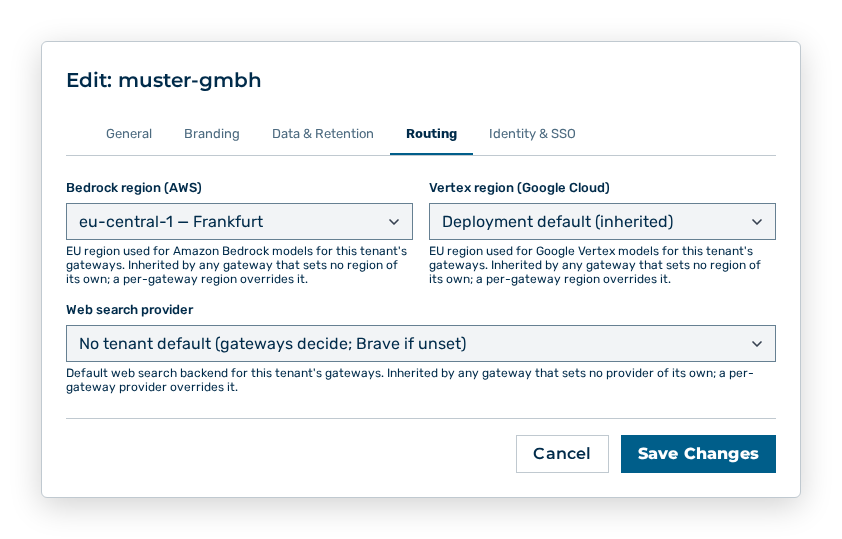
Routing tab
You change the following entries in the Routing tab:
| Entry | Effect of the change |
|---|---|
| Bedrock region (AWS) | Sets the EU region for Amazon Bedrock models of the gateways of this tenant. Every gateway without a region of its own inherits it. A gateway region takes precedence. The Deployment default (inherited) entry inherits the platform setting. |
| Vertex region (Google Cloud) | Sets the EU region for Google Vertex models of the gateways of this tenant. The same precedence rules apply as for the Bedrock region. |
| Web search provider | Sets the default web search backend for the gateways of this tenant. Every gateway without a provider of its own inherits it. A gateway provider takes precedence. Under an active EU data residency, Myra AI Workspace raises a provider outside the EU to the EU tenant default. The web search API key of the gateway must match the effective provider. |
Entries in the Identity & SSO tab
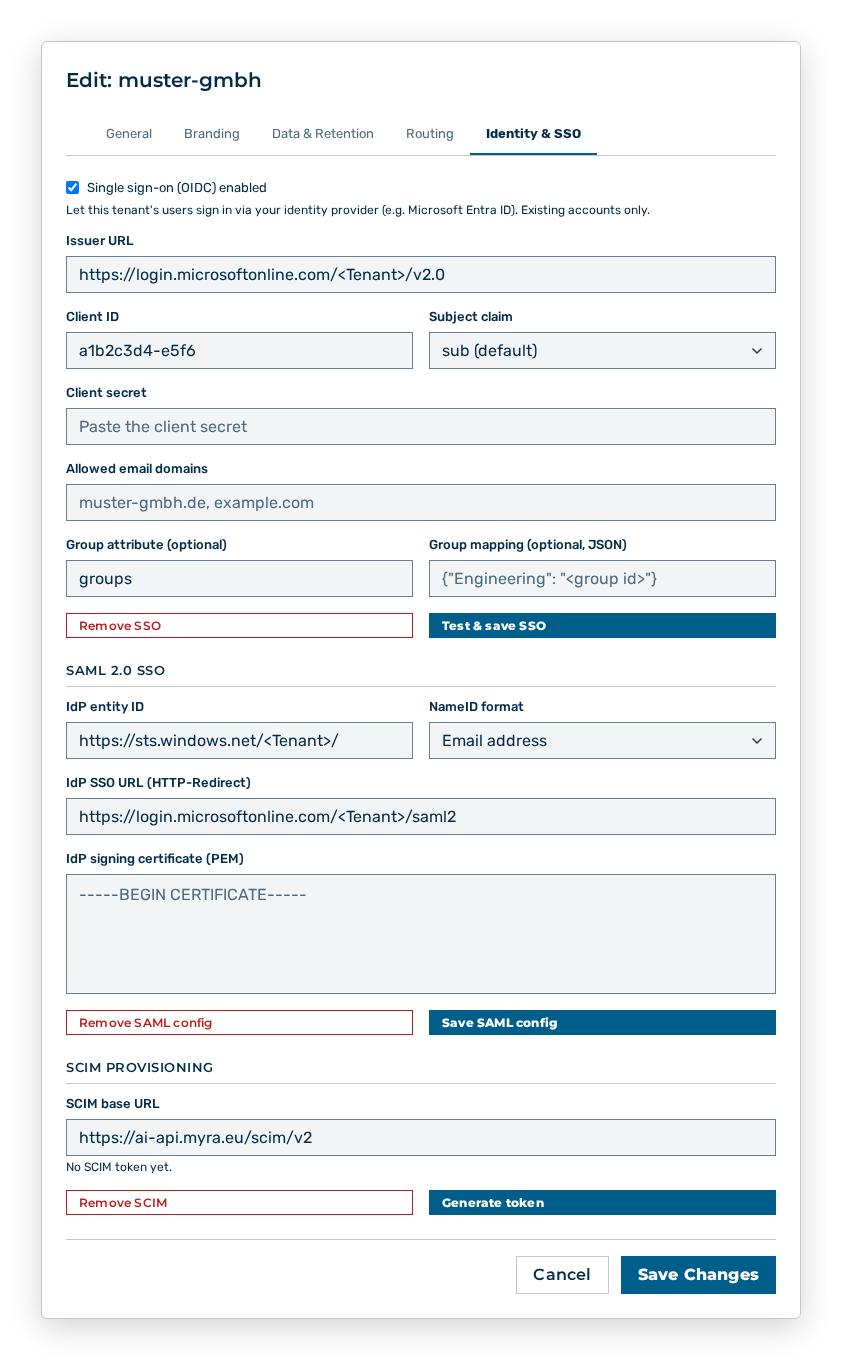
Identity & SSO tab
You change the following entries in the Identity & SSO tab:
| Entry | Effect of the change |
|---|---|
| Single sign-on (OIDC) enabled | Lets the users of this tenant sign in via your identity provider. The access applies to existing accounts only. The Issuer URL, Client ID, Client secret, and Subject claim entries describe the identity provider. |
| Allowed email domains | Restricts the sign-in to the comma-separated domains entered. Your identity provider signs in users of these domains only. |
| Group attribute and Group mapping | Map an external attribute value to an internal group ID, for example {"Engineering": "<group-id>"}. Only the listed values grant a membership. |
| SCIM provisioning | Lets your identity provider create, update, and deactivate the user accounts of this tenant, and sync groups. You enter the SCIM base URL and the generated bearer token in your identity provider. |
| SAML 2.0 SSO | Sets up the sign-in via a SAML 2.0 identity provider. The IdP entity ID, IdP SSO URL, IdP signing certificate (PEM), NameID format, and Allowed email domains entries describe the identity provider. You register the ACS URL there. |
The following options are available in the tab:
| Option | Description |
|---|---|
| Test & save SSO button | Checks the configuration and saves it. After the saving, the dialog reports SSO configuration saved. |
| Remove SSO button | Removes the OIDC configuration. After that, the dialog reports SSO configuration removed. |
| Generate token button | Generates a SCIM bearer token. The token appears once. Copy it immediately. For an existing token, the button carries the Rotate token label. |
| Remove SCIM button | Removes the SCIM credentials. |
| Save SAML config button | Saves the SAML configuration. After the saving, the dialog reports SAML configuration saved. |
| Remove SAML config button | Removes the SAML configuration. |
Note
If the tenant was changed by someone else in the meantime, then the dialog reports This tenant was changed by someone else. Reload and try again. The Save Changes button applies the changes of all tabs. During the saving it carries the Saving… label.
Deleting a tenant
The following requirements are met:
- ☑ Your user account has the Purge tenants permission.
Proceed as follows to delete a tenant:
Organisations view
-
► In the User Management area, open the Organisations tab.
- ▷ On the start page, click on your name at the bottom of the navigation bar.
- ↳ The user menu opens.
User menu
- ▷ In the Workspace group, click on the User Management entry.
- ↳ The navigation bar shows the User Management area. The Members tab is open.
Navigation bar in the User Management area
- ▷ Open the Organisations tab.
- ► Open the tenant.
- ↳ The detail view of the tenant opens.
Detail view of a tenant
- ► Click on the Delete Tenant button.
- ↳ The Delete tenant "
"? This will also delete all their gateways, keys, and tokens. query opens.
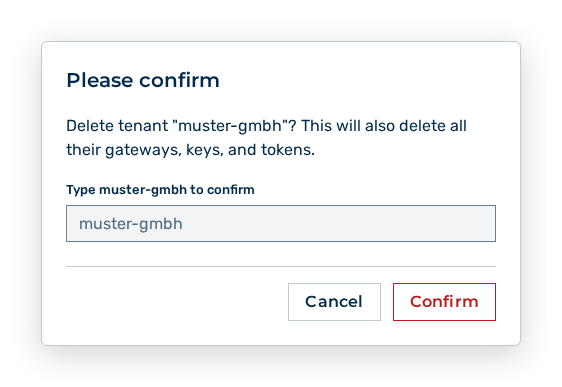
Delete tenant query
- ► Enter the identifier of the tenant in the field.
- ► Confirm the query.
- ➔ Myra AI Workspace deletes the tenant with its gateways, user accounts, and data.
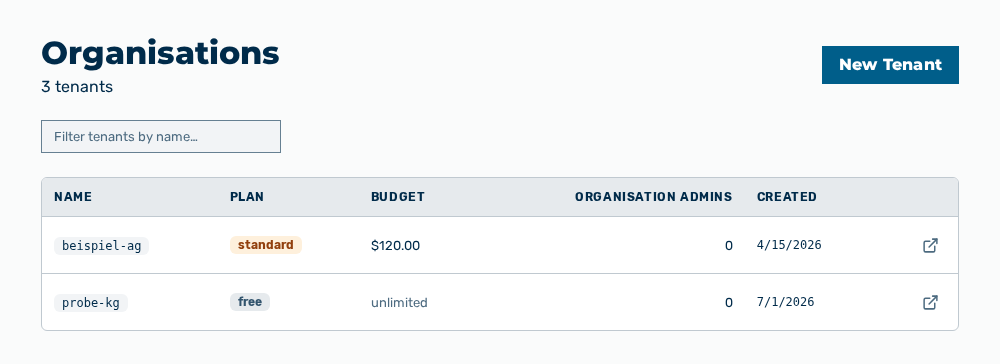
Organizations view without the tenant
Attention
Myra AI Workspace does not undo the permanent deletion of a tenant. The query enables the acceptance only when the identifier is in the field exactly.
Effects of the deletion
The deletion has the following effects:
| Object | Effect |
|---|---|
| Tenant | Myra AI Workspace deletes the tenant. During the deletion, the button carries the Deleting… label. |
| Gateways | All gateways of the tenant are removed. The endpoint URLs of these gateways are no longer reachable. |
| Provider keys | All stored keys of the tenant are removed. |
| Authentication tokens | All tokens of the gateways lose their validity. Requests with these tokens fail. |
Note
Export the data of the tenant via the Export data button before you delete it.
Note
These tasks need the Create tenants and Purge tenants permissions. These permissions stay reserved for the Administrator role. A role of your own does not take them.